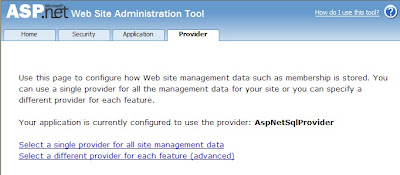
By default, Visual Studio Express likes to store all its membership and roles data in a local user instance provider called AspNetSqlProvider that uses a database called ASPNETDB.MDF in your APP_DATA directory in your project. This type of database is called a user instance.
I think it would be beneficial to expose some terms here.
- provider: this is an asp.net object that supplies information to the website software. There can be numerous providers in an application and a provider doesn't necessarily connect to a database. It could just as easily connect to an XML file, a text file, a random number generator or a golden retriever...
- membership: is the information about members, i.e. login, password, email address, etc.
- roles: This data can be kept separate from the membership data and describes what roles are assigned to each user (admin, guest, moderator, whatever) It also contains information about what roles have access to which features in your site.
- user instance: This is a database stored in your APP_DATA directory. There are severe performance issues with this type of database, and many ASP hosts do not support user instances.
- MSSQL Express: This is the free version of Microsoft SQL Server Database (MSSQL). even though a user instance database is this type of a database, in this article MSSQL Express database refers to a database created with SQL Server Management Studio Express tools. These databases are not a part of your website, but can be accessed by one or more websites. The data does not exist in your website folders and must be published separately.
- MSSQL: Microsoft SQL Server is the full paid version of SQL server (the one you'll probably use on your live website if you are a corporate developer, or you're using a professional ASP.net web hosting service.
Create a New Database
This assumes that you are not using an already existing database... if you already have a MSSQL Express database you can skip this step. Just open SQL Server Management Studio Express (download it if you don't already have it) and create an empty database.Add the Membership and Roles Tables
There is a special program you can use for this, but you must learn the secret handshake. This program is part of the .NET framework and resides in your .net folders. The program name is Aspnet_regsql.exe and I suggest you find it by browsing to C:\WINDOWS\Microsoft.NET\Framework and doing a search for Aspnet_regsql.exe. On my system I find one copy of it in the C:\WINDOWS\Microsoft.NET\Framework\v2.0.50727 folder (strangely not in the v3.0 or v3.5 folders).Launch the program.
Click Next.
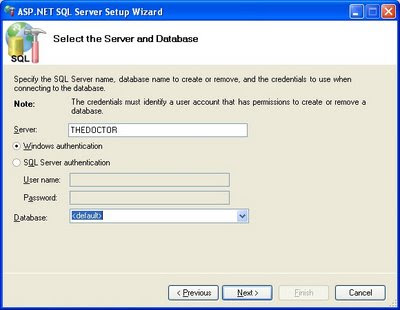
Select Configure SQL... and click Next.

The Server is the Windows name of your computer, but WAIT, don't pop open that Database list or you'll get the dreaded...
Connection failed...error.
Failed to query a list of database names from the SQL server. An error has occurred while establishing a connection to the server. When connecting to SQL Server 2005, this failure may be caused by the fact that under the default settings SQL Server does not allow remote connections. (provider: Named Pipes Provider, error: 40 - Could not open a connection to SQL Server)
This is not Microsoft's finest work, and this is where you must know the secret handshake I mentioned earlier. You must alter your Server Name to make this tool recognize that we're using SQLExpress. Add \SQLEXPRESS to the end of your computer name. Mine reads THEDOCTOR\SQLEXPRESS. It also worked to use .\SQLEXPRESS. Note also that if you named your SQL server something else when you installed it, you need to use that name. The pop-down list will be enabled to open and there will be a list of all the databases on your machine.
Databases can be shared across machines too - in case your database isn't on the same machine that you develop on.
Select your new database and click Next.
Review and if all is well, click Next again.
Click Finish.
The database is ready for you to create membership and roles info. Now all we have to do is...
Tell web.config about the new database.
There are 3 steps for this.- create a connection string.
- hook up the Membership provider.
- hook up the Roles Manager.
1. The Connection String
<connectionStrings>The bold text should be changed to reflect your database and server names. The name property (in green) will be needed to identify the connectionstring to the providers.
<add name="MYDATABASE" connectionString="Data Source=THEDOCTOR\SQLEXPRESS;Initial Catalog=AFIDatabase;Integrated Security=True" providerName=".NET Framework Data Provider for SQL Server" />
</connectionStrings>
2. The Membership Provider
<membership defaultProvider="MyProvider" userIsOnlineTimeWindow="30">The clear removes any references to the default databases from machine.config.
<providers>
<clear/>
<add connectionStringName="MYDATABASE" applicationName="/" enablePasswordRetrieval="false" enablePasswordReset="true" requiresQuestionAndAnswer="true" requiresUniqueEmail="false" maxInvalidPasswordAttempts="5" minRequiredPasswordLength="4" minRequiredNonalphanumericCharacters="0" passwordAttemptWindow="10" passwordStrengthRegularExpression="" name="MyProvider" type="System.Web.Security.SqlMembershipProvider" />
</providers>
</membership>
Note that the Membership object contains the definition of the provider which contains a reference to the connection string. The applicationName property is used to identify the application - you can share this name across many websites to allow a single signon for many sites.
So the membership object uses the MyProvider provider which uses the MyDatabase database.
( Membership object -> MyProvider -> MyDatabase )
3. the Roles Manager
<roleManager enabled="true" defaultProvider="MyProvider">Note that even though I named the provider MyProvider again, it is in fact a different object. However, this allows me to use the Single Provider setting in the website settings page in Visual Web Developer.
<providers>
<clear/>
<add connectionStringName="MYDATABASE" applicationName="/" name="MyProvider" type="System.Web.Security.SqlRoleProvider, System.Web, Version=2.0.0.0, Culture=neutral, PublicKeyToken=b03f5f7f11d50a3a" />
</providers>
</roleManager>
Now if you open the ASP.NET Configuration page from Visual Web Developer (Website - ASP.NET Configuration) and click the "Providers" tab, then the "Single Provider" option, you should see the new provider you just created, and it should already be connected.
If the configuration page crashes for any reason, there are a few things to try.
- ensure that the names of your providers match the "defaultProvider" property exactly.
- ensure that you have used the same applicationName everywhere.
- ensure that the connectionStringName in your providers exactly match the name in your connectionStrings section.
For Further Reading
- Membership Providers
- roleManager Element (ASP.NET Settings Schema)
- Creating and Configuring the Application Services Database for SQL Server